Introduction to cTrader: The Quick Setup Every Trader Should Know
Table of content
Ever opened cTrader and thought, “Okay… where do I even start?” You’re not alone. The platform is fast and clean, but only after you set it up properly.
A good setup does two things. It reduces mistakes (wrong lot size, missing SL, messy charts). And it saves time (fewer clicks, fewer tabs, less searching).
In the next 10 minutes, you’ll turn the default cTrader view into a workspace that matches how you trade:
Practical watchlists
Default chart template
Order ticket settings.
Below is a nine-minute introductory video about cTrader. It’s worth watching before we move on to the main sections of the article.
Before You Start
Before you touch any settings, make sure you’re using the latest version of cTrader.
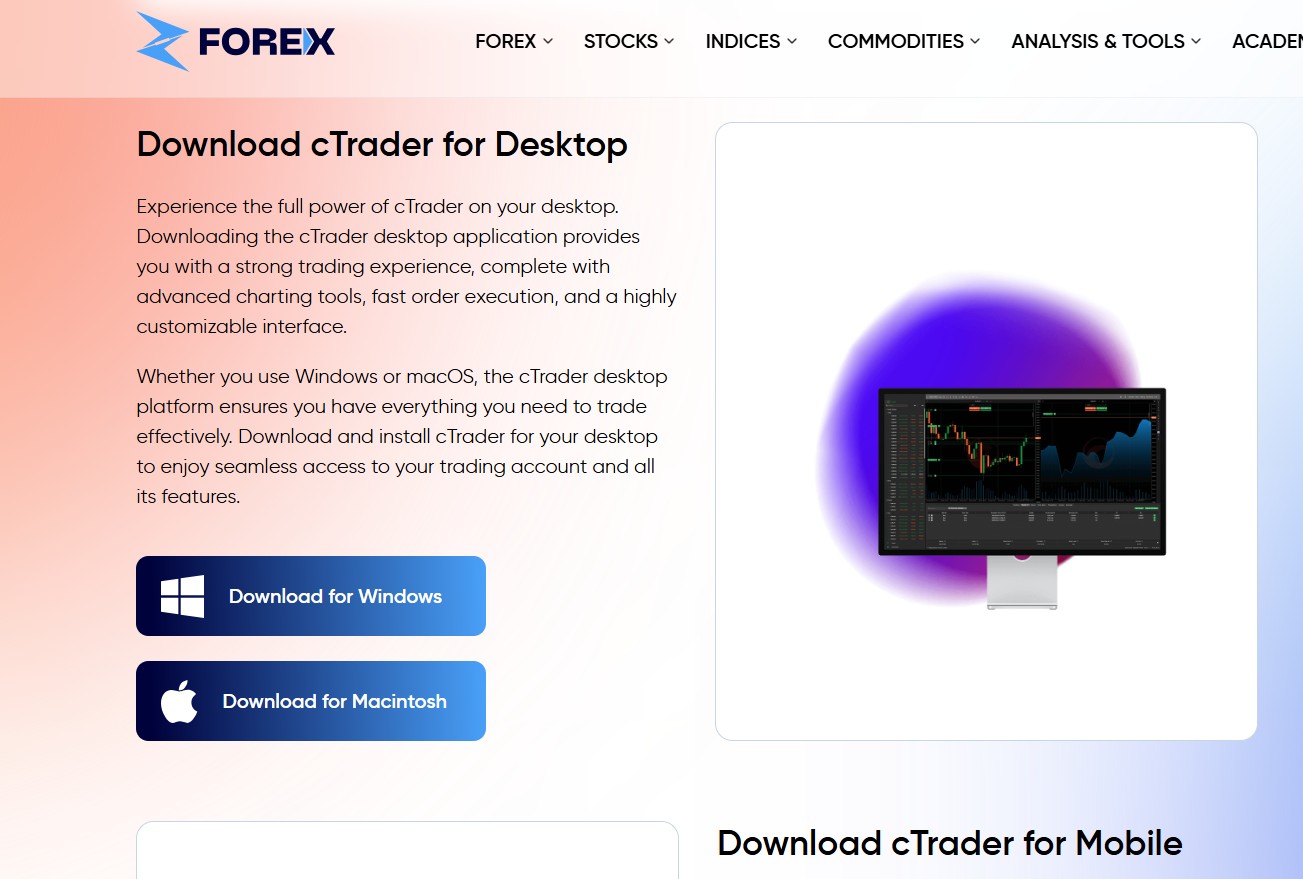
1) Download cTrader
If you have not installed it yet, start by downloading the platform and signing in.
cTrader Desktop: Best for a full trading workflow
Web cTrader: Great when you want quick access
cTrader Mobile App: Ideal for monitoring positions and managing trades on the go
2) Open a free account (Demo or Live)
To follow the steps in this guide, you’ll need a cTrader login connected to a broker.
On zForex, you can open a cTrader demo account in minutes to practice the setup in real market conditions.
Start with Demo if you’re new to cTrader or changing platforms.
Use Live when your workflow is tested and you’ve locked in your risk rules.
3) Have these 3 “preferences” ready
Your main instruments: (example: EURUSD + XAUUSD + US30)
Your timeframes: (example: 4H for direction, 15M for entries)
Your risk habit: fixed lot vs fixed risk per trade
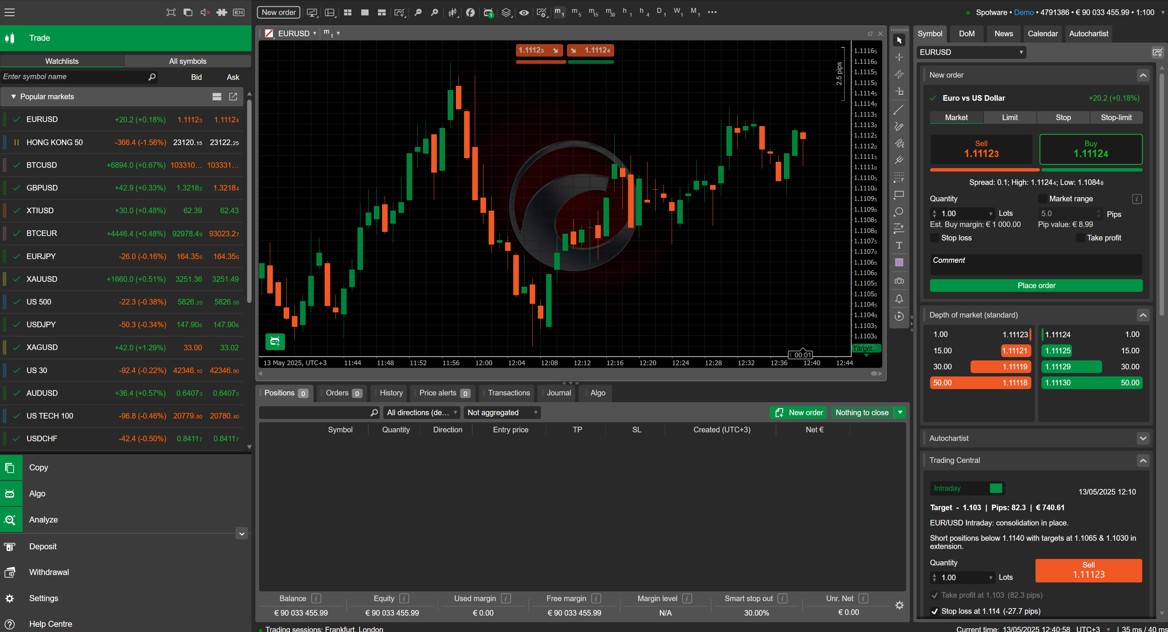
Create a Clean Workspace
The default layout is fine for exploring cTrader, but a clean workspace is the foundation of fast trading on any trading platform.
Choose Your Layout
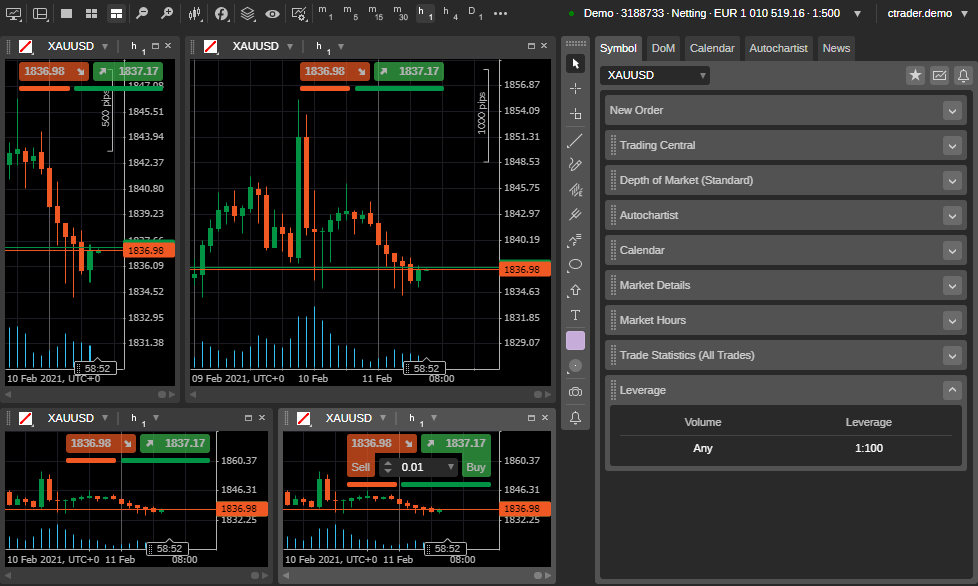
When you first log in, cTrader may show multiple charts and panels. Instead of using the default layout, build a simple one:
Recommended beginner-to-intermediate layout:
1 main chart
Watchlist on the left
Positions / Orders panel at the bottom
Order Ticket floating or pinned to the right
How to set a layout in cTrader:
Go to Layout in the top menu.
Select Single-Chart Layout.
Drag the Watchlist to the left and Positions to the bottom.
Keep only the panels you use.
Remove Any Panels You Don’t Use
Too many docks slow you down. Close or minimize parts you don’t need for daily trading.
Panels you can safely hide for now:
Calendar (enable only when needed)
Automate, if you’re not using cBots
Copy, if you’re not following strategies
Market Depth (DOM) unless you’re trading with Level 2 data
Panels to keep pinned:
Watchlists
Chart
Trade / Positions panel
Order Entry
Your goal is to turn the platform into something you instantly understand when you open it.
Create a “Default Workspace” and Save It
Once the workspace looks clean:
Go to the top-right and open Workspaces.
Click Save Workspace As…
Name it something like “My Default” or “Clean Setup”.
Set it as your Startup Workspace (so it loads automatically whenever you open cTrader).
This prevents you from rebuilding your layout every week.
Optional: Create a Second Layout for Multi-Chart Trading
If you normally trade multiple symbols side by side (like EURUSD + Gold):
Add a 2-chart or 3-chart grid
Keep the same indicators on each chart to avoid visual inconsistency
Save it separately (for example: “Dual Chart - London Session”)
This way you can swap layouts with one click depending on your trading day.
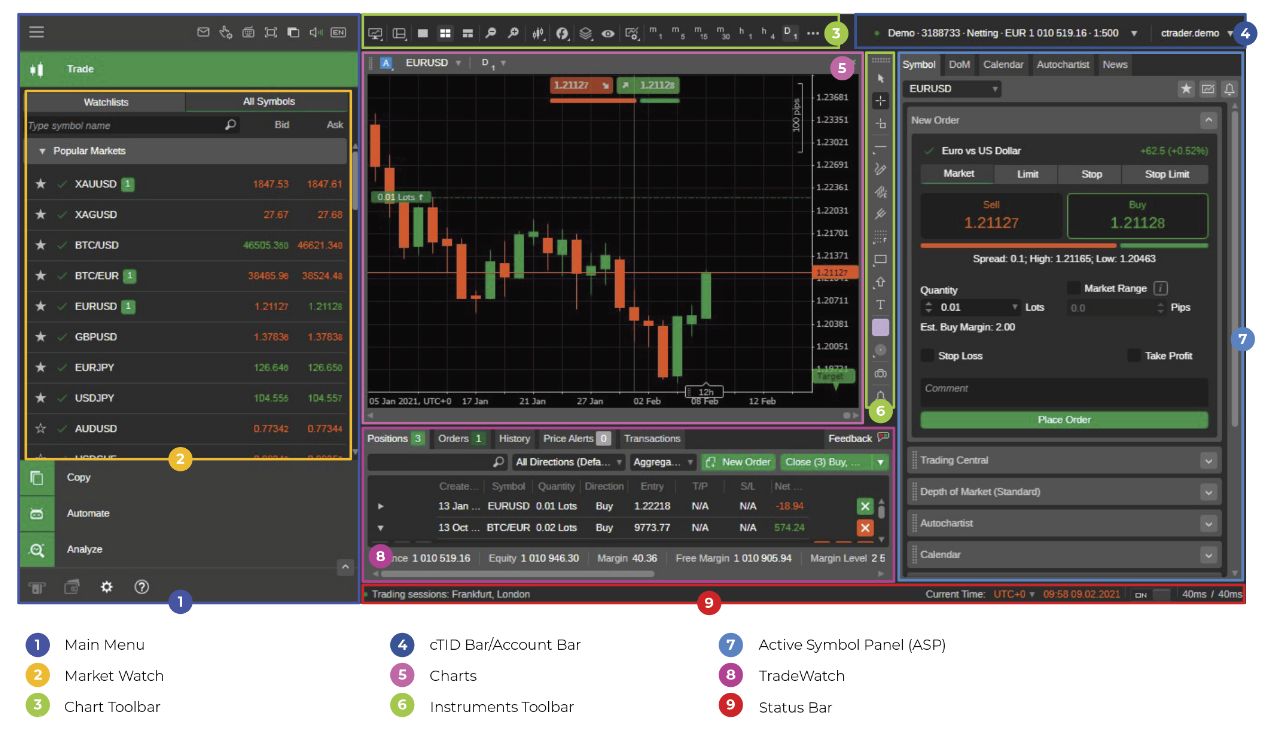
Building Watchlists in cTrader
A proper watchlist keeps your attention where it matters. Instead of getting lost in a long list of symbols, you only see the pairs and markets you trade. cTrader makes this easy, but most traders never clean up the default list.
Step 1: Open the Watchlist Panel
If it’s not visible:
Click Active Symbol Panel (left sidebar)
Select Watchlists
Pin the panel so it stays open
Step 2: Create Your First Custom Watchlist
A clean workflow starts with your main trading list.
In the Watchlist panel, click + New Watchlist
Give it a simple name:
Major FX
Metals
My Core Markets
Click Add Symbol
Type the symbol name (e.g., EURUSD, XAUUSD)
Hit Enter to add it instantly
Step 3: Build 2–3 Watchlists
For trading clarity, most active traders only need:
1) Core FX
Your main recurring markets. Example:
EURUSD
GBPUSD
USDJPY
USDCAD
AUDUSD
2) Metals & Commodities
For traders following Gold, Silver, or energy. Example:
XAUUSD
XAGUSD
UKOIL
USOIL
3) Event-Based or Session Watchlist
For pairs that behave differently depending on the day. Example:
USDTRY (volatility-driven)
EURGBP (data days)
NAS100 / US30 (New York session focus)
This setup helps you filter noise and stick to your plan.
Step 4: Sort the List in a Useful Way
cTrader lets you sort symbols by:
Spread
% Change
Volume
Symbol name
Sorting by spread is especially useful for scalpers.
How to sort:
Hover over the column header in the Watchlist
Click once to sort ascending
Click again to reverse the order
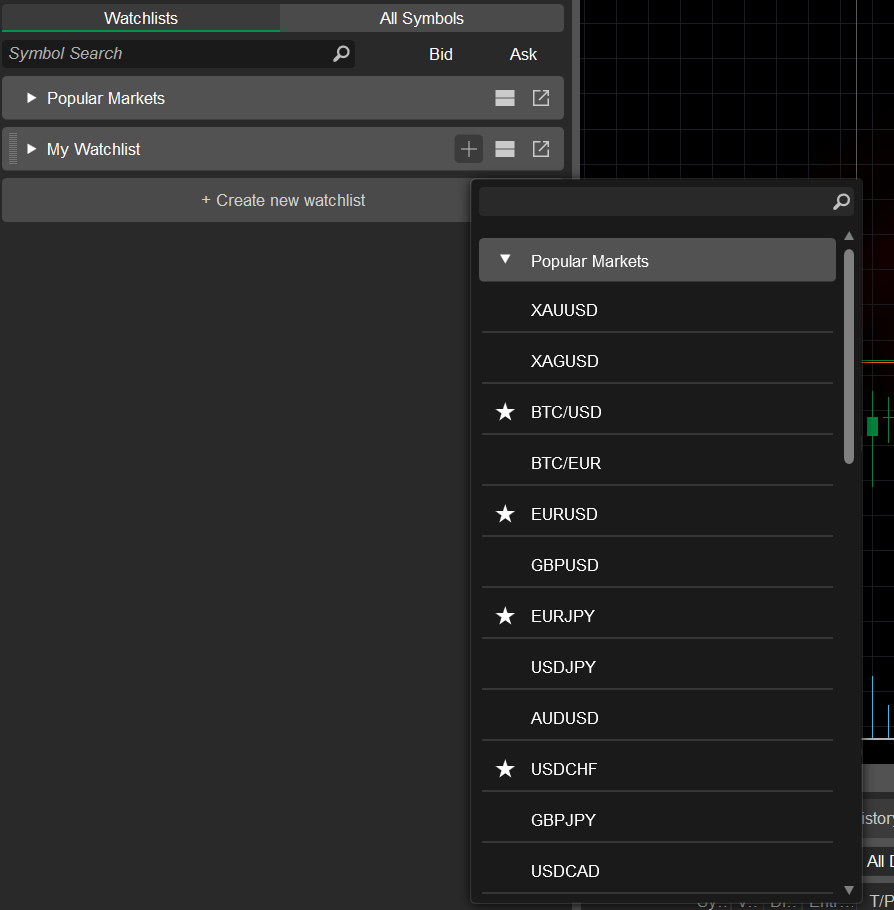
Step 5: Use the Star/Favorite Feature
When you highlight a symbol with a star (★), it appears in your Favorites list. Use this for short-term opportunities:
A pair forming a key breakout
A symbol you’re actively monitoring this week
Temporary high-volatility markets
This helps you avoid constantly hunting through lists.
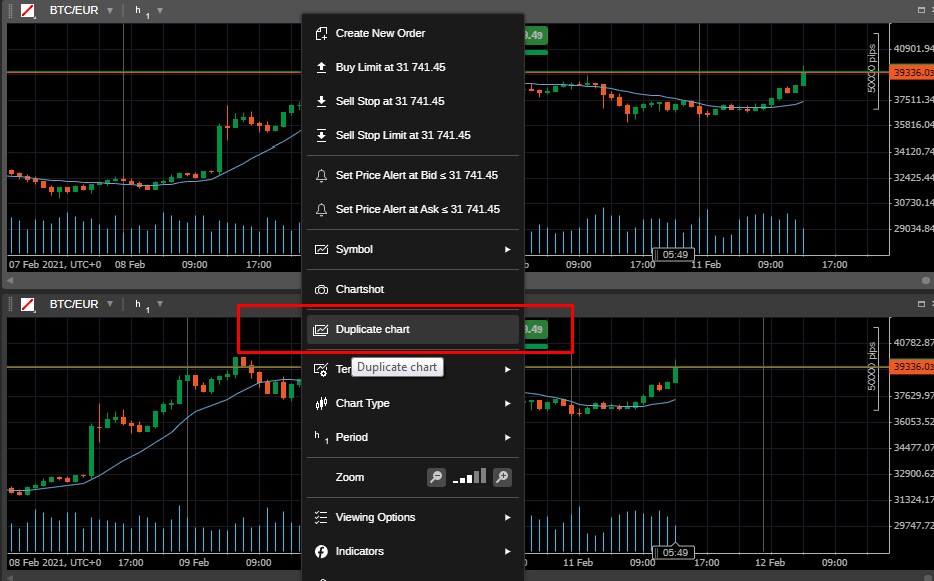
Step 6: Duplicate a Watchlist for Sessions (Optional)
If you trade different sessions:
London Session List
New York Session List
You can duplicate a list and adjust symbols for each session.
Right-click the watchlist name
Select Duplicate
Rename the copied version
Setting Your Chart Defaults and Templates
This is where cTrader starts feeling “yours”. Once you set up clean charts and save them as templates, you won’t need to rebuild your layout every time you open the platform.
Step 1: Open a Fresh Chart
Pick any symbol from your watchlist (EURUSD or XAUUSD works fine).
Click the symbol
Select New Chart
Choose Candle view (most popular)
Step 2: Choose Your Timeframes
You don’t need ten timeframes open at once. Pick two or three that fit how you trade.
Examples:
Swing traders: Daily, 4H, 1H
Day traders: 1H, 15M, 5M
Gold scalpers: 15M, 5M, 1M
How to set it:
Click the timeframe bar (top of the chart)
Pin the timeframes you use most
Unpin others you never touch
This keeps your chart clean and prevents accidental clicks.
Step 3: Add Your Favorite Indicators
cTrader indicators are quick to add, but the mistake is adding too many.
Price Action / Trend Setup:
20 EMA
50 EMA
RSI (optional)
Volatility Setup:
ATR
One Moving Average
Support/Resistance Setup:
No indicators
Only drawing tools (horizontal line, rectangle)
How to add indicators:
Click Indicators on the right panel
Search your indicator
Double-click to add
Adjust parameters (left panel)
Close the panel to save space
Step 4: Adjust Chart Appearance
Make your charts easy to read. Many traders prefer the following set-up:
Candles with higher contrast
Grid turned off
Bid/Ask lines turned on
Slightly thicker candle borders
How to edit appearance:
Right-click the chart
Open Chart Properties
Change colors, grid, scaling, and session breaks
Save changes
This takes only one minute and makes a huge difference.
Step 5: Save Your Chart as a Template
This is one of the most time-saving features in cTrader.
How to save a template:
Right-click the chart
Click Template
Choose Save Template
Name it something clean like: “FX Clean”, “Gold Setup” or “Price Action Basic”.
Now you can switch templates instantly when changing instruments.
Step 6: Apply Your Template to All Charts
If you use the same setup across different markets, you can apply your template to every chart in just a few clicks. Open any chart, right-click and select Template, then choose Apply to All Charts. Instantly, all your charts follow the same clean, consistent layout.
Step 7: Save the Workspace Again
Any time you change your chart structure, update your workspace.
Open Workspaces
Click Save
Your layout, templates, and panels stay exactly as you left them
Configure Order Entry
cTrader gives you several tools for proper entries, but you need to set them once, so they work the way you expect on every trade.
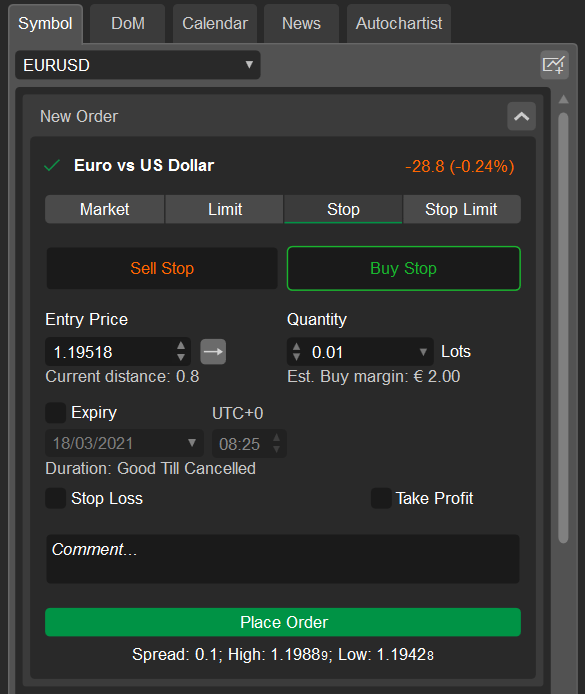
Step 1: Open the Order Ticket
Click any symbol in your watchlist and hit Buy or Sell. This will open the Standard Order Ticket, where you can configure:
Volume
Stop Loss
Take Profit
Order type
Expiration (for pending orders)
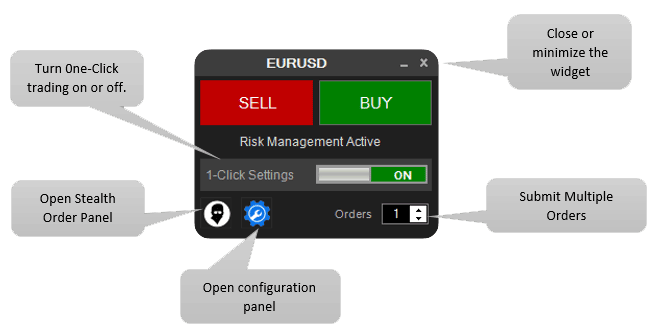
Step 2: One-Click Trading Settings
One-Click Trading allows you to enter a trade instantly with a single button. Great for experienced traders, dangerous for newcomers.
To turn One-Click Trading on or off, click the cogwheel icon in the top-right corner, choose One-Click Trading, and confirm the risk warning if you decide to enable it.
It’s a useful tool when you scalp, need instant entries, trade only a few instruments, or always add your stop-loss right after execution.
Skip it if you’re still learning the platform, you don’t trade frequently, or you’re prone to accidental clicks, speed helps only when precision is there.
Step 3: Set Your Default Trade Size
Instead of adjusting lot size every time, set a default that aligns with your risk routine.
How to do it:
Open the Order Ticket
Enter your usual volume (example: 0.10 or 1.00)
Click Set as Default (in the ticket menu)
You can override it anytime, but having a default prevents oversized trades.
Step 4: Configure Your Stop Loss and Take Profit Rules
The platform lets you choose how SL/TP behave. This is one of the most important parts of your setup.
You can set SL/TP by:
Pips
Price
Percentage
Monetary value
Choose the method you’re most comfortable with.
How to enable default SL/TP in cTrader
Open Order Ticket
Click Advanced
Set SL and TP values
Select Use as Default for this symbol or Apply to all symbols
Step 5: Learn the Fast Order Panel
cTrader has a QuickTrade Panel directly on the chart.
To enable:
Click the QuickTrade toggle under the chart
Set the mode: Single-Click, Double-Click, Disabled.
This tool is perfect for traders who enter and exit frequently and want to avoid switching panels.
Pre-Trade Safety Checks
This is the final part of your setup. These quick checks take less than a minute and dramatically reduce bad entries, surprise spreads, and emotional mistakes.
Check 1: Spread & Trading Conditions
Before placing any trade, glance at the symbol panel.
Typical things to check:
Current spread (tight enough for your strategy?)
Session (London, NY, Sydney)
Volatility spikes (news minutes)
Market depth if you use it
Check 2: Confirm Timeframe Alignment
Whatever your entry timeframe is, make sure it agrees with the higher-timeframe bias.
Quick workflow:
4H: Market direction
1H or 15M: Entry conditions
5M: Only if you need precision
If your lower chart conflicts with the higher direction, skip the trade.
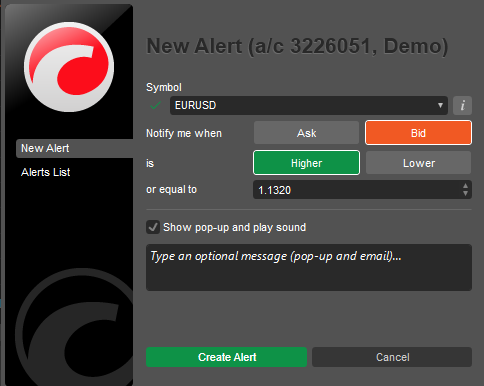
Check 3: Set Alerts Instead of Watching Charts
Use price alerts to avoid forcing trades out of boredom.
Good alert types:
Breakout levels
Pullback zones
News reminders
Volatility alerts
How to place a price alert in cTrader
Right-click the price on the chart → Create Price Alert.
A lot of trading errors come from the wrong volume.
Before clicking Buy/Sell, check:
Volume matches your plan
Leverage impact
Margin requirement
SL distance fits the lot size
Even experienced traders sometimes forget this.
A trade can behave one way during London, and completely differently in late New York or Asia.
If you're trading pairs like GBP, USD, or XAUUSD, always check:
Are we close to a news release?
Is liquidity thin?
Is the pair active in this session?
These small checks help avoid unexpected spikes or slow, choppy movement.
Quick Final Checklist
Before placing every trade:
Spread seems acceptable
Timeframe alignment confirmed
SL and TP ready
Volume is correct
No major news in the next few minutes
Alert set
This routine takes under 30 seconds in real life.
Once you walk through these steps, cTrader stops feeling like a default platform and starts working as your personal trading workspace. Everything becomes smoother: charts look the same every time, orders behave the way you expect, and your focus stays on the market, not on settings. Treat this setup as your foundation. Refine it as your strategy evolves, save your changes, and let the platform support the way you trade, not the other way around.
Start Trading Now
Sign up in seconds for free, access your platform, and start trading with ease.